How to build a grow box for less than $100

When my husband and I moved into our first home, we were so excited to finally have a backyard. For us, a backyard meant BBQ's, kids with grass-stained pants, hammock lounging (still waiting for our hammock), and finally, a vegetable garden.  

Here is step-by-step tutorial on how to build a basic grow box. There are books out there that explain this in much greater detail, but if you're looking for something basic, this tutorial will walk you through it. We built both of our grow boxes + soil + seeds for right around $160. Not bad at all! If you want to start with one grow box, you'd be looking at under $100. Can't beat that!

Our two grow boxes are 6' long x 4' wide and have a depth of 8". The following measurements/materials are based on this. (Note: if you're making only one grow box, you will cut these measurements in half)

What you'll need:

Go to Home Depot, Lowe's or a lumbar yard and grab yourself the following things:

  • Four 2x8x10" beams. Make sure they are straight by examining them from the side and looking for any obvious bowing. Have a worker there cut them all at 6', so you're left with a 4' side for each one. This will be all the wood you'll need for two grow boxes. At $9.77 each, this came to a total of $39.08.
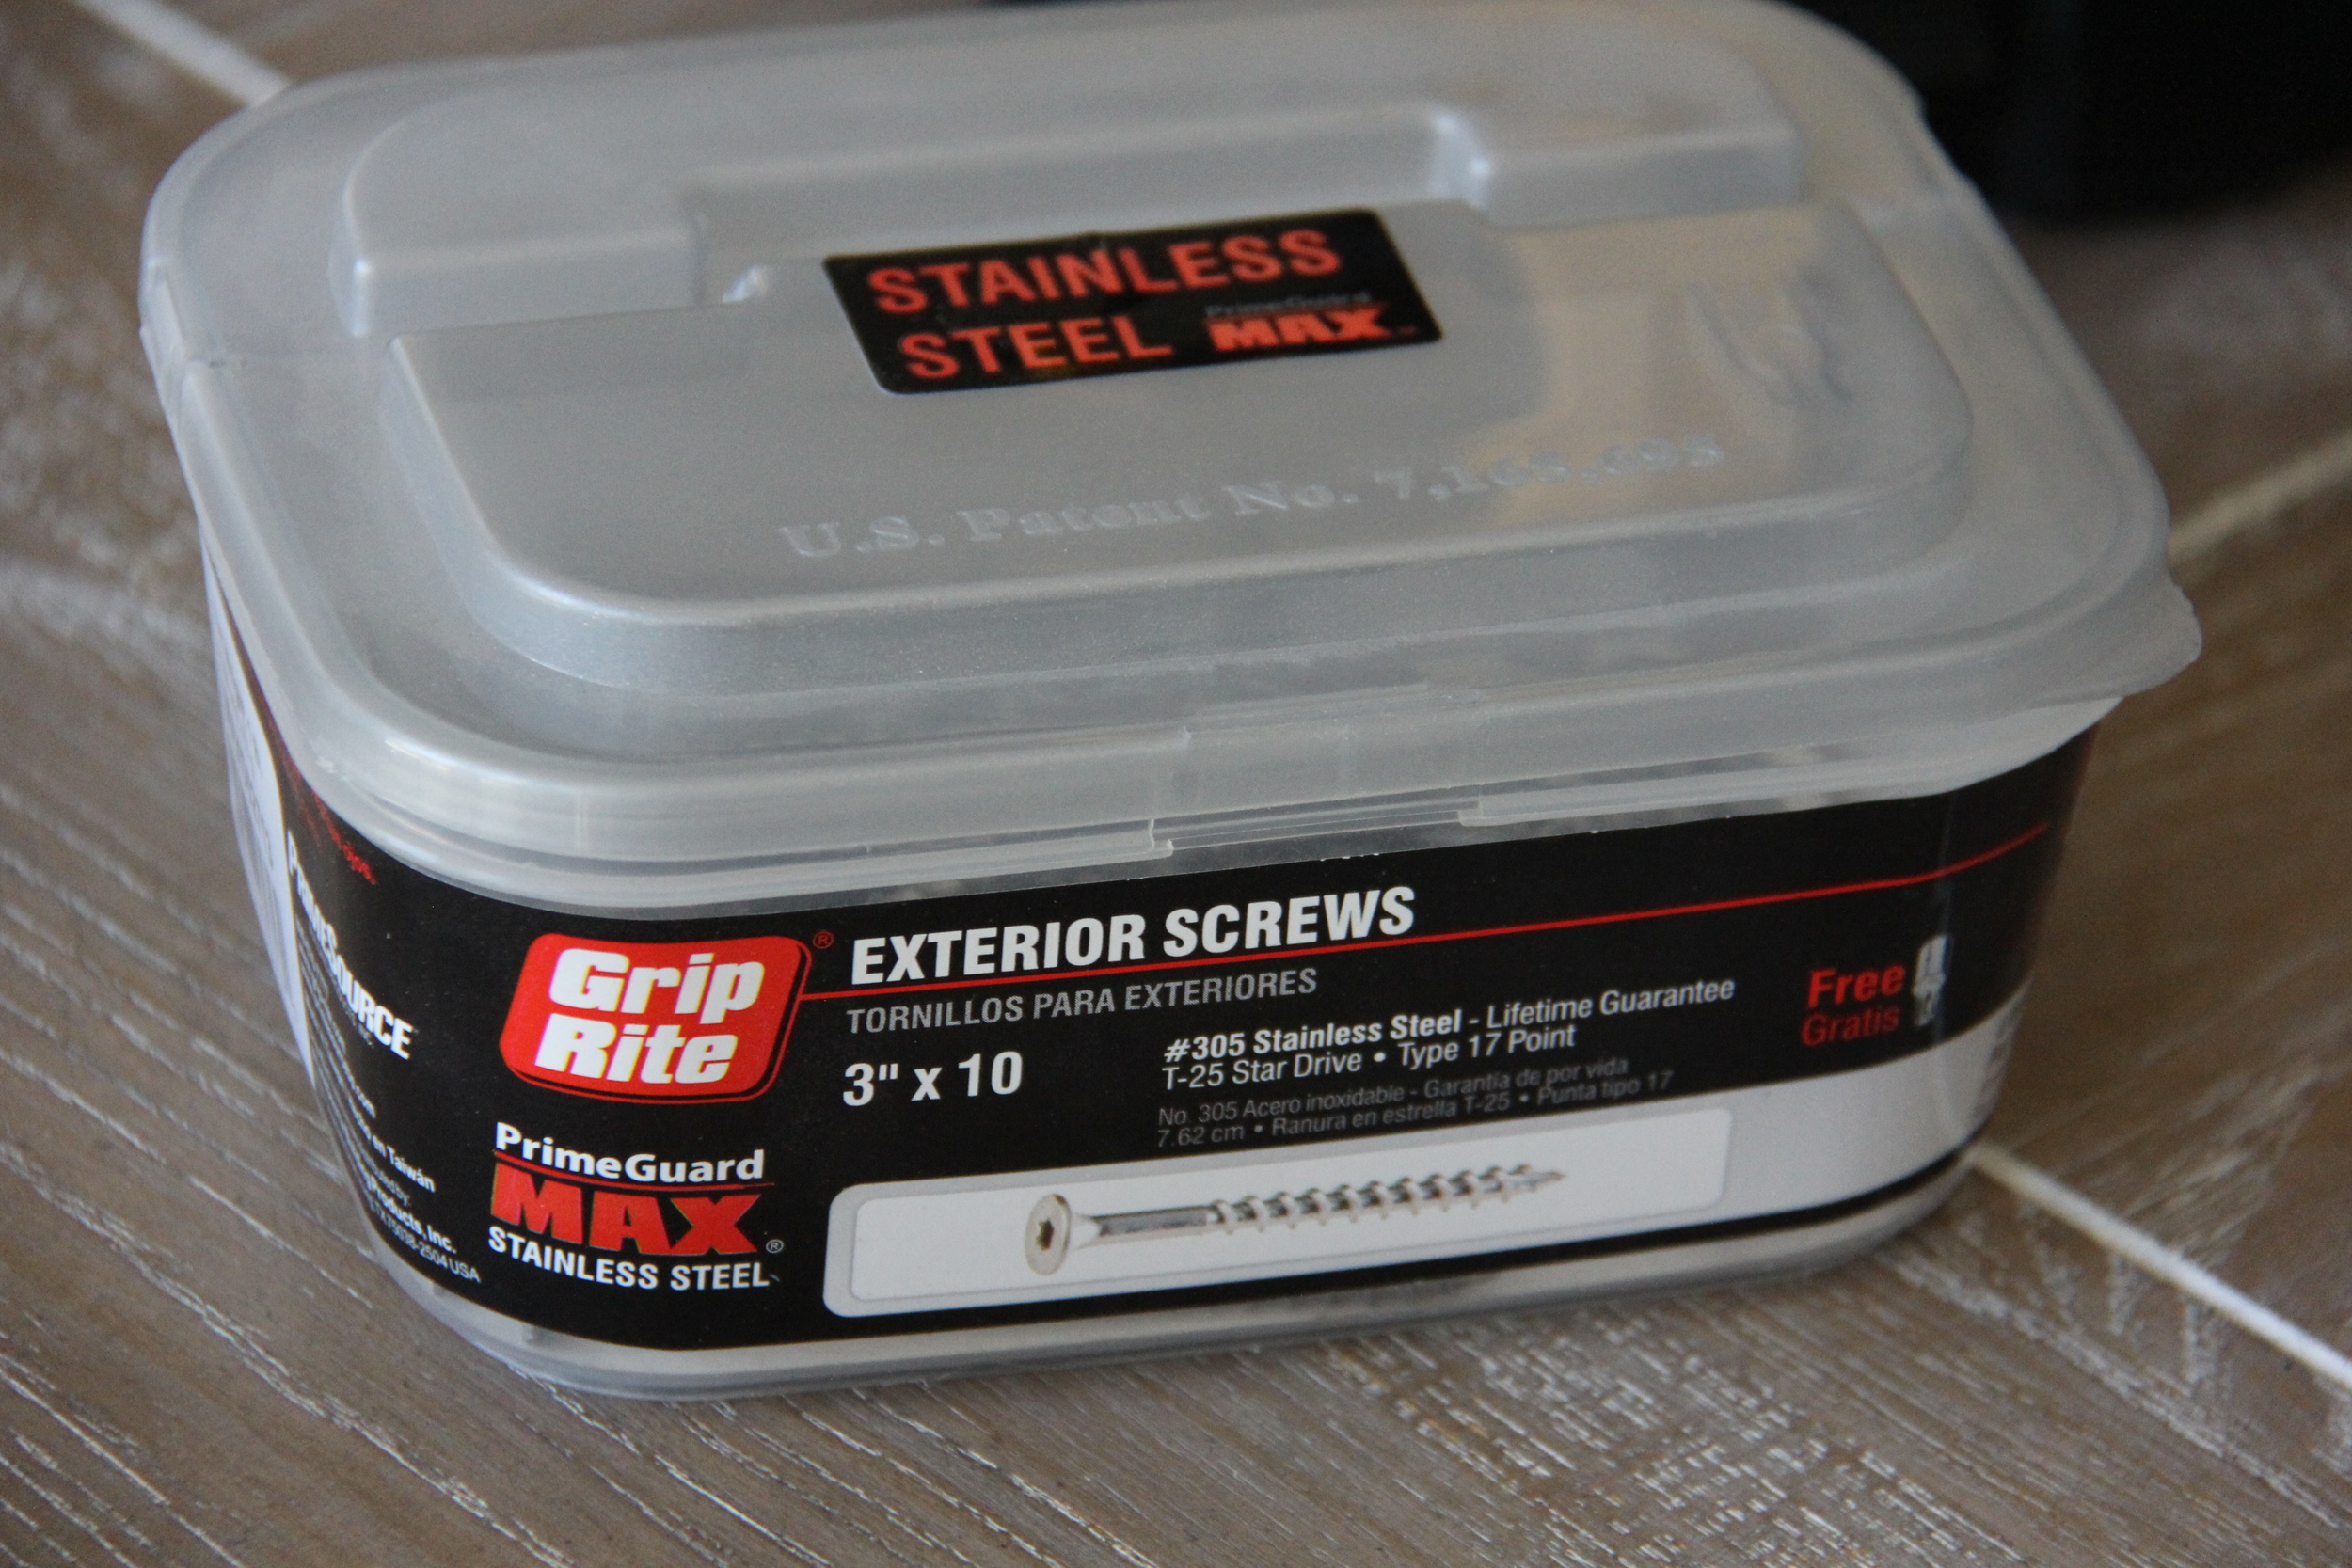
  • A pack of 3" deck screws or "grabbers": $14.96. If you already happen to have 3" screws, you'll only need a total of 24, so that can save you some money.
  • 6'x50' weedblock fabric. This was the smallest size available when I went, so you can totally spit this with someone else! The cost of this was $24.97.
  • If you are planning on doing tomatoes, peas, beans, or anything that you want to climb up a trellis, then I would recommend getting either PVC pipe, or 1/2" conduit, 90-degree angles to hook them together, netting, and some rebar to anchor them into the ground. You'll see in my pictures that I haven't put in my netting yet, but you'll get the idea of the trellis.

That comes to a total of only $79.01!! You'll be surprised at how easy they come together.

  • Now for the soil. My mom gave me a book I'd highly recommend called Square Food Gardening, by Mel Bartholomew. This guy knows his stuff. For the soil, he recommends getting a combination of several different things:  peat moss, vermiculite, and some different composts to mix. My mom bought them all separately and combined them (he teaches how to do this in his book), but I went for a little easier, faster, and less expensive route since we wanted to get ours in quickly.

I bought 1 cubic yard off of Big Yellow Bag. I highly recommend this company! It's easier than ordering pizza! I went with the BYB Biogarden GROmix Soil at $144. I then split it with someone. This soil has a mixture of peat moss, vermiculite, topsoil, and some different manure in it. They delivered the big yellow bag of soil right to my house, and it came within 2 days! I split the cost with my aunt, who used the other half, and viola! The one problem with this was transporting the other half to her house. One bag weighs ~600 pounds, and so even half of it was still ~300 pounds. We had to get several people to lift it into the truck to transport. So, if you share with someone else, be warned that the bags are heavy!

In hindsight, I would've done the soil a little differently. I later spoke with a woman on the phone from Big Yellow Bag and she said that if you just wanted the half cubic yard and you owned a truck, you could actually put tarp down in the bed of a truck, and go pick it up yourself, saving you the shipping and delivery cost, and it would come out $35 not including taxes!! So really, you could do both grow boxes for around $120 if you're pinching your pennies! I think that's a smart idea if you own a truck. Their address is 9980 South State Street, in Sandy. Their telephone number is 801-562-9090, so be sure to call beforehand to make sure the pricing is still the same and that they still offer that option.

  • You will need a Phillips screwdriver, and a hammer

Instructions:

  1. Clear your grow box area of weeds, till the soil, and level off your plot where the grow boxes will go. I used Roundup Extended Control to spray over everything once it was all leveled off, because we used to have weeds galore in that space.

2. Lay down the weed blocker fabric and cut to size. We had little stakes to keep the corners down, but you could just put heavier rocks on the corners to set in place.

3. Lay out your wood and arrange in box shape. You'll want the corners to look like this (below). If one side of your board is the inner side of the angle, the other side of the board should take the outer angle. This way, your measurements are even around all sides.

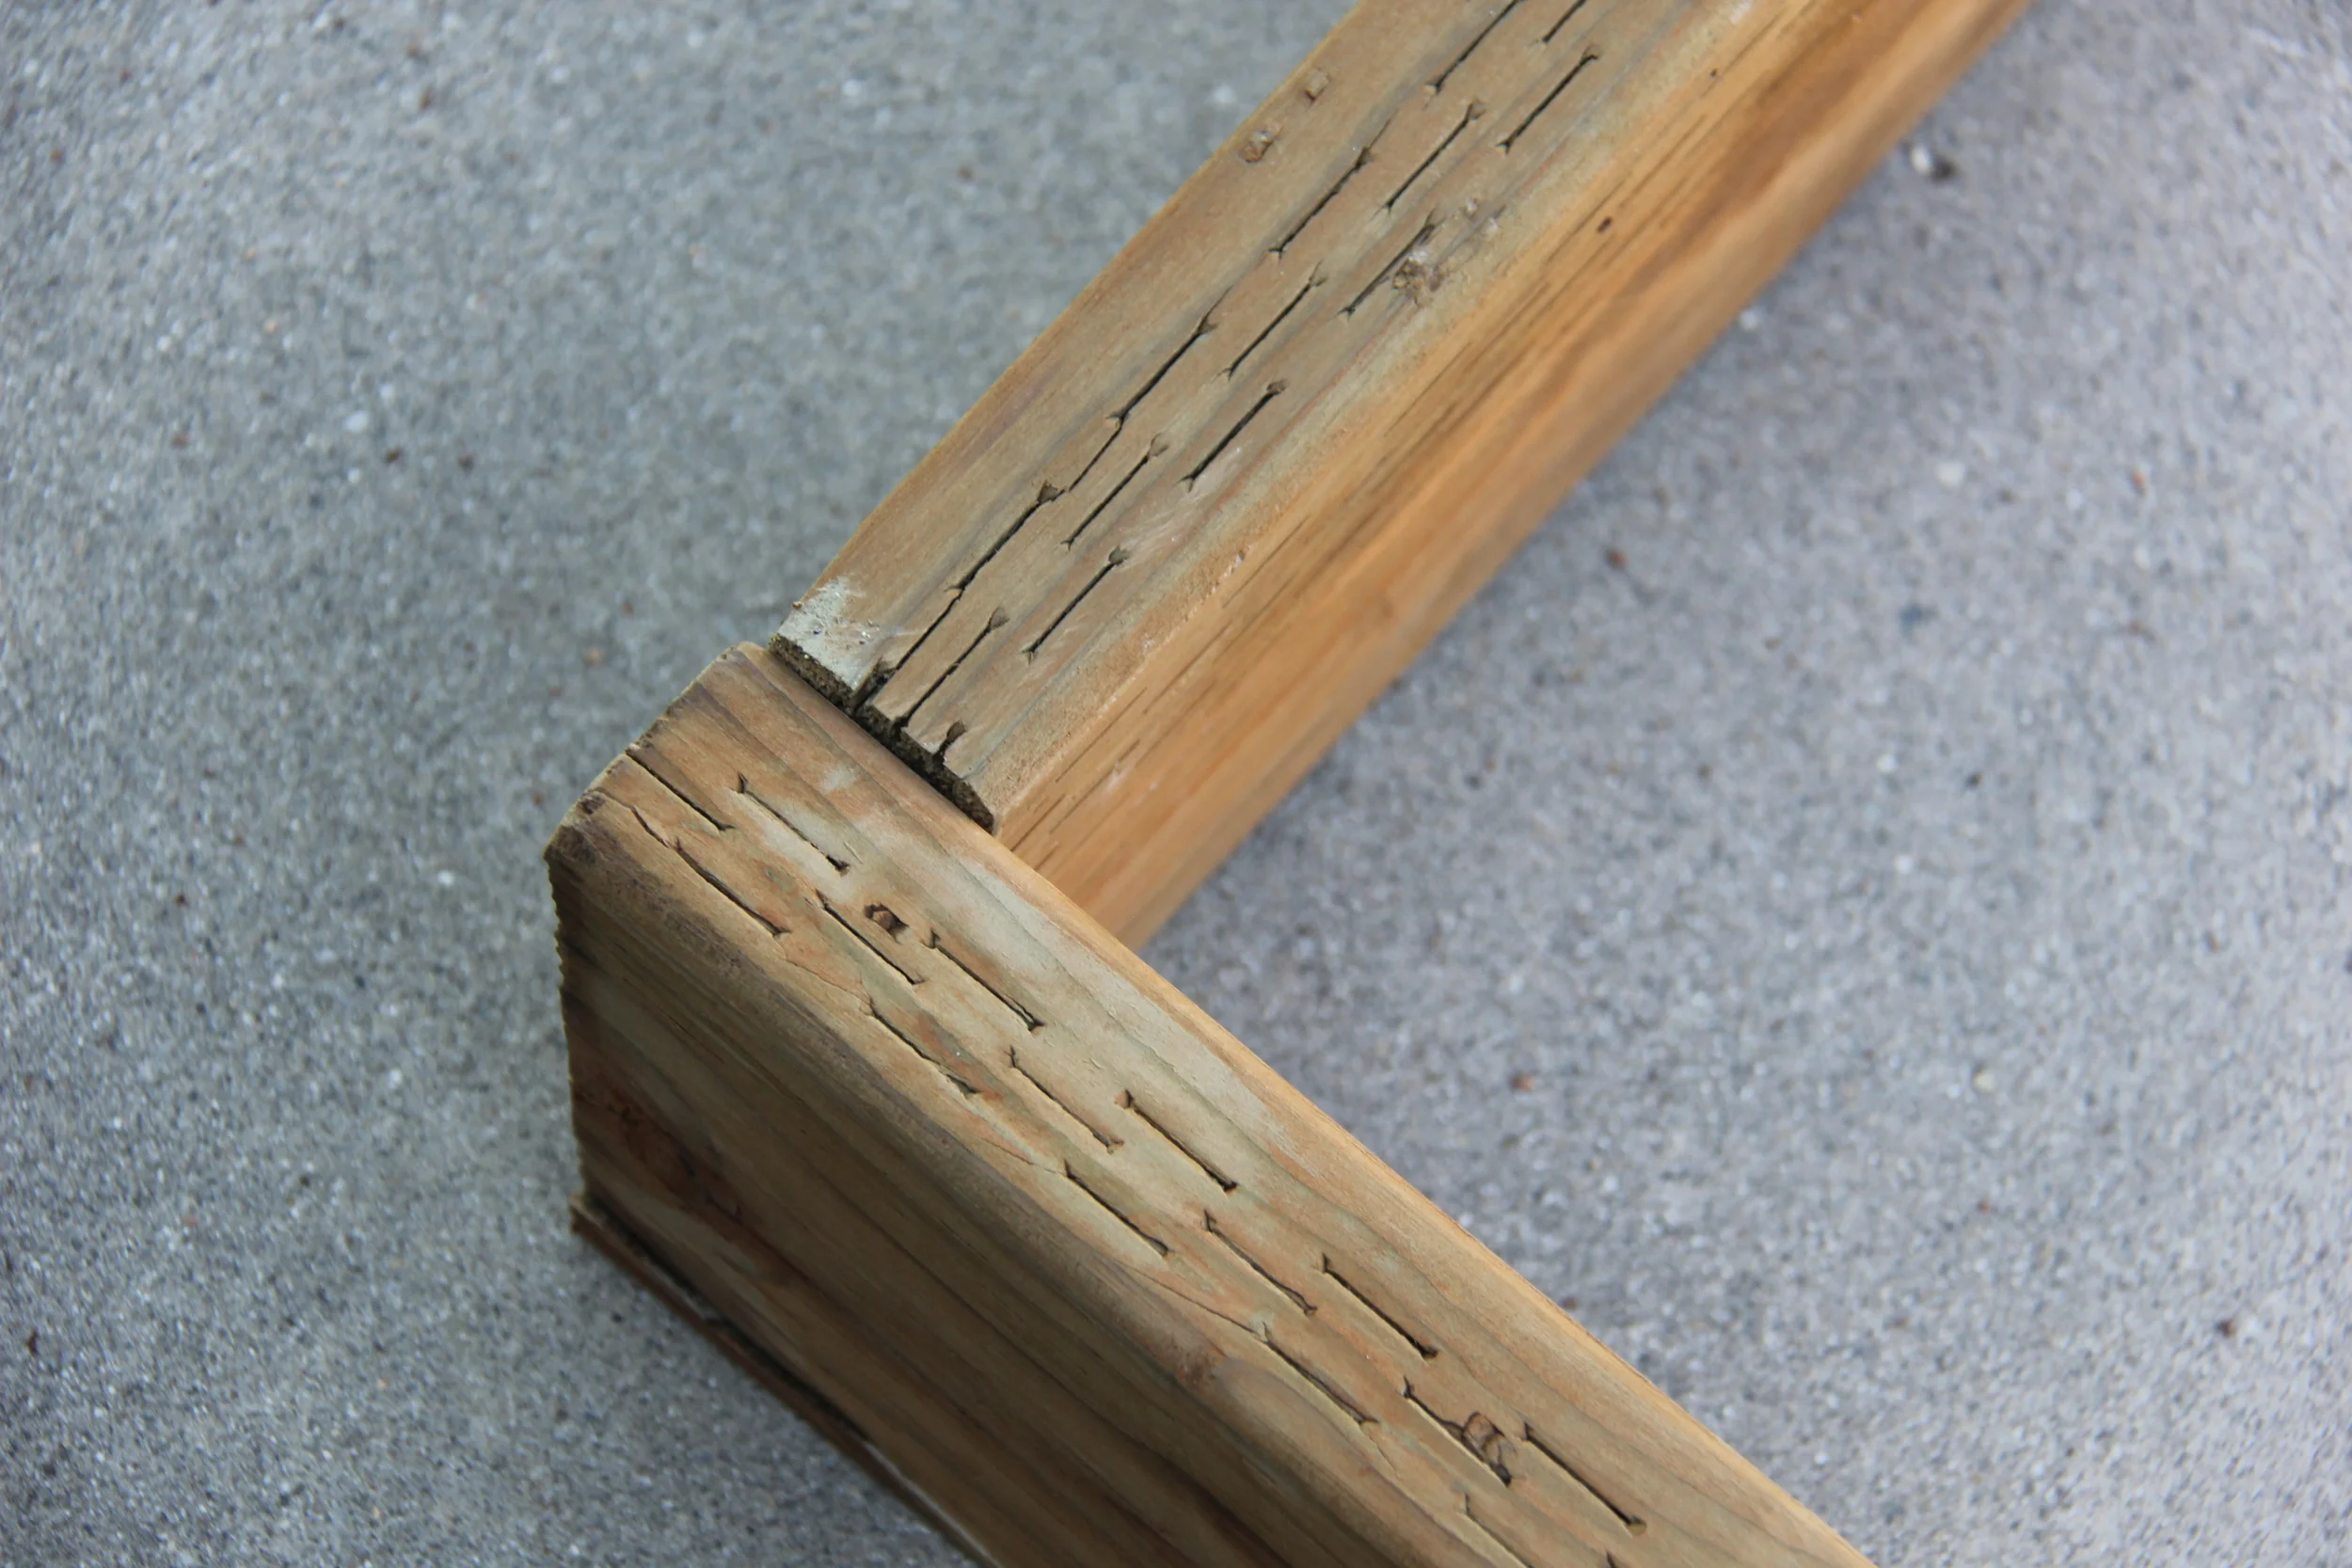
4. Take your deck screws and put three screws in each angle, one on each side and one securing the middle down.

5. Once you've made your box, lift it carefully over to your weed blocker fabric and set in place. Repeat steps 3-5 again for a second box.

6. Take your soil and gently fill boxes, evening out the top to desired height.

7. Follow the instructions on individual packages for seeds. We planted tomatoes, beans, strawberries, zucchini, yellow squash, kale, and romaine lettuce. Can't wait for harvest!!


St. Patrick's Day Muffins

My dear friend inspired me to make this recipe, and I was over-the-top excited when I took my first bite!! SO YUMMY. I'm always looking for ways to get more veggies and greens in for my family, and the spinach in these is so subtle, you'd never even know. If you like banana bread, these are for you. Give them a try! You can even freeze them for later use as well!

Yields: 12 muffins

Ingredients:

1 banana

1 1/2 cup whole wheat flour

1 tsp. baking power

1/2 tsp baking soda

1/2 tsp sea salt

1/2 cup unsweetened apple sauce

2 tsp. vanilla

1 egg

2-3 cups spinach (chopped into tiny pieces... the smaller the pieces, the more green your muffin will be!)

2 Tbsp. coconut oil

1/4 cup maple syrup

2 Tbsp. almond milk to thin out, if needed

Instructions:

1. Heat oven to 350 degrees

2. Mix all ingredients together starting with the dry ingredients first.

3. Drop into greased muffin tin and bake at 350 for 15 minutes or until lightly browned and the center is done **do the toothpick test ;)**

Enjoy!

Sore Muscles?

You go to the gym, kill your workout, come home feeling good, but wake up the next morning feeling like you can’t move your body out of bed.

Has this happened to you?

When we talk about sore muscles, we are talking about DOMS, or delayed onset muscle soreness often felt 24-72 hours after intense exercise. This usually lasts for a couple days. How do you work through it? Or do you rest?

There is not need to be alarmed when you are experiencing delayed onset muscle soreness- it happens! And it usually happens after you’ve tried something new, gone to a new class, performed a new sequence, added weight to a workout, etc. It’s okay! And it’s also okay if you AREN’T experiencing extra sore muscles after a workout too- it doesn’t mean you didn’t go hard enough. You can’t be measuring the effectiveness of a workout by how sore you are! Please don’t!

The more I’ve trained, doing a variety of different things: TRX, weight lifting, cardio, biking, swimming, different classes… the less sore I get overall and the more quickly my body recovers.

There are many opinions out there on what to do when experiencing DOMS- do you rest? Do you keep training? Here’s my take on the subject:

Rest and recovery are required for optimal training results if you are feeling super uncomfortable and sore. It’s okay to take a rest day if you wake up feeling like you can’t move. Take that rest day as a day to stretch and roll out your muscles, and hydrate yourself. I usually give it a day or so to rest my muscles before I go at it again. Even scheduling a yoga flow class or day for stretching in between your heavy lifting days, would be a good idea. Since my rest day is always Sunday, I like to workout my total body on Friday or Saturday to give my body the rest it will require through the weekend.

If the soreness lasts longer than the normal couple of days, or is associated with more pain than usual, it might be an injury rather than just soreness. If you have to adjust your normal activities due to this pain, it would be best to check up with a medical professional!

Things to do to reduce the sore muscles: stretch after working out with a warm-up and cool-down, roll them out with one of these (click the button below).

The best way I've found to fully recover, is to rest and take time for those muscles to repair. 24-48 hours of good rest, rolling them out with one of those foam rollers, good hydration, and adequate protein intake will help you recover quick- you'll be going at it again in no time. 

Good luck!

Tortellini Soup

How can you beat a quick and easy soup made in ONE pot!? This dish brings comfort right into your home. Give it a try.

Yields: 6-8 servings

Ingredients:

Half a package of (or two of) Aidell's Sausage, sliced (**we love Chicken and Apple**)

3 cloves garlic, crushed

1 onion, chopped

3 cups low sodium beef broth

3-4 large carrots, (or 1 cup of baby carrots), sliced

1 (28-oz.) can crushed tomatoes

1/2 tsp. thyme

1 tsp. basil

1 tsp. oregano

1/4 cup chopped parsley

1 green pepper, chopped

8-10 oz. cheese tortellini

salt and pepper to taste

parmesan cheese to top (optional)

Instructions:

1. In a large pot, put your sausage, garlic, and onions in and saute until sausage is browned and onions are clear.

2. Add all other ingredients EXCEPT for the tortellini. Let simmer for 15-20 minutes. (If you are losing some of the water by having it simmer, you can add a little bit more water to thin it out at this point.)

3. Add in the tortellini and let simmer until tortellini is tender, about 7 minutes. You want to remove from heat once the tortellini is done so it doesn't get too soggy. 

4. Serve with parmesan cheese and enjoy!

Recipe inspired by "Favorites" version of Tortellini Soup

Taco Soup

This recipe is easy, you probably have everything sitting in your pantry already! While it rains/snows here, I'm still craving warm, comfort food and this hits the spot every time.

Ingredients:

2 cups low sodium chicken broth

1 can salsa, ~15.5 oz.

1 tomato, chopped

1 can kidney beans

1/2 tsp. garlic salt

1/2 onion, dicd

1 lime, squeezed

1 can corn, drained

1-2 cups cooked chicken, *optional!

Avocado, cheese, sliced olives, and a dollop of Greek yogurt to top!

Instructions:

In a large pot over the stove combine all ingredients and heat until boiling. Reduce heat and let simmer for 5-10 minutes before serving. Enjoy!

My favorite hiking backpack

The question I always seem to be getting:

What hiking backpack

do you use?

As you know, in the warmer months, I'm usually hiking weekly. We spend much of our time in the mountains, and I knew once we had Ellie, we needed a good pack to bring her along on our adventures.

I did a lot of research on this. I don't have a great lower back, and I wanted to be sure to find something that wasn't going to be strenuous on my back while carrying our little Ellie. I also was willing to pay a little bit more for this, if I knew the quality was something that would last me through all my kids. After a lot of research, my husband and I decided to go with The Osprey Poco Plus Kid Carrier, and we've never looked back. I also have a bunch of my friends who have bought it ever since I've shown it to them, and all of them have loved it.

CLICK here TO FIND IT.

(and that's the best price I've found.)

Let me tell you the reasons why I love it so much.

1. I'm 5'5," my husband is 6'1", and this pack has adjusted great for both of us, never causing either one of us lower back pain. If you know how to adjust the straps just right, the weight is evenly distributed to your hips and lower body in a way that relieves your shoulders and back from taking too much of the weight. (That's what the AG stands for in the name: Anti-Gravity.)

2. I love that we've used this from when Ellie had the strength to hold her head up...  and we can use it until she gets to be ~50 lbs!! (Hopefully by then, she'll be a good enough hiker to be OUT of the pack!)

3. The space this backpack provides is amazing. Not only do you have many pockets to choose from when you're on the go, but the main, back pocket fits more than you'll ever need for a daytime hike and has storage space of 1587 cu in.

4. I love how lightweight it is. With aluminum framing, this backpack only weighs 7.67 pounds. I know there are probably lots of lighter-weight ones out there for all you crazy, hard-core, backpacking hikers, but this one does the trick for me.

5. There's a removable and washable drool pad, as well as other features to make it easy for you. SCORE. Moms, you know how amazing this is. This pack has been designed to make your baby happy... and as we all know... A happy babe = happy parent. 

6. Ellie LOVES this pack. If you've been on any of my MOMSTRONG hikes, you've likely seen her fast asleep in the back. Not only is her seat padded and comfortable, but it also has the mesh around it for ventilation. The addition of the sun shade is a MUST. I've never had to worry about her overheating or getting a sunburned scalp in this pack. 

I made a quick video below to hopefully answer any of your other questions.

**There's another option which is a little bit cheaper, and you can find that here. There's also the Poco Plus Premium, and you can find that here.  The main differences between the three are shown on the table below, and we decided to go right in the middle.

As I was looking through my pictures from last year, I realized I have probably close to 100 with this backpack in it. I've seriously used it everywhere... from the mountain, to when we've mowed the lawn and had her on our backs, to cleaning the house (it works wonders), to taking her on weekend trips. It has come with us everywhere!

Good luck in your search and I'm hoping to see more of you on the trail this year!!

Happy hiking!

Raffle Prizes for Go Mom Give

*For those attending "Go Mom Give" on March 8th, be thinking about where you want to place your 10 raffle tickets that night! These are the items we will be raffling off!

·      A custom cake from Cake By Courtney for your next big event

·      A free 40-day fitness/meal plan from Clean Simple Eats

·      Gift basket full of HIGH Fitness Apparel

·      $50 gift card to Senita Athletics

·      Gift basket full of Redmond Farms’ favorite products

·      $100 gift basket from Redmond Real Salt

·      A one month unlimited membership to Awaken Studios and $150 your choice of a 2017 Awaken Retreat

·      $100 gift card to The Stock Place for some cute and stylish clothes

·      Self Care Gift Basket + a free postpartum wellness consultation (and more!) through The Healing Group

·      A $300 running evaluation from Mountain Land Physical Therapy. A runner’s dream!

·      A gift basket from Pure Fit Pure Food including one of their free transformation plans, Tera’s Whey Protein, two “perfect plates”, and more!

·      $50 gift card to Soel Boutique for some shopping fun

·      A special gift from Crate and Barrel for your kitchen/cooking

·      A free six month bow subscription from Little Poppy Co.

·      $50 gift card to Albion Fit

·      A stunning necklace from Made by Mary (9 winners will be chosen here!)

·      A $300 gift basket, including a $100 pass to This Is The Place Heritage Park

·      A fabulous, relaxing, 90-minute massage from Monica Fauxkota

·      Gift certificate to “feel good about your body” postpartum workshop through Align Integration and Movement

·      And our biggest raffle surprise… a TWO NIGHT SUITE STAY AT STEIN ERIKSEN LODGE in Deer Valley during this summer ($800 value!)


Awesome, right!? Only two weeks away!

The Madelyn Salad

My new favorite salad, named after my friend Madelyn, who I adore in every way. She first shared it with me, and I've been in love ever since.  It's one I know you'll love too: quick, easy, delicious, and perfect for any dinner party coming your way! What more could you ask for?

Salad Ingredients:

Lettuce (spinach, spring mix, baby kale, power greens, chard, arugula all work here)

Goat cheese or feta cheese

Red onion, sliced thin

Maple syrup nuts (pecans, almonds, or walnuts are my fave)

Dried cranberries or fresh berries

Barlett pears, or apples

Instructions for maple syrup nuts:

Heat 1 Tbsp. olive oil in skillet

Add chopped/sliced nuts, about 1-1.5 cups

Add 3-4 Tbsp. pure maple syrup

Watch these carefully and continue stirring the entire time so they don't burn. They will caramelize in about 4-5 minutes. Do not overdo these! Lay out on parchment paper when finished and sprinkle with a pinch of salt over top. 

*I literally can't get enough of these and keep a whole bunch stored in my cabinet for when I need a treat, or when I need something to make my salads a tad bit fancier. ;)

Ingredients for Dressing:

1/2 cup olive oil

1/8 cup. red wine vinegar

1/8 cup maple syrup (honey is good too!)

1 Tbsp. stone ground mustard

1 Tbsp. Dijon mustard

Salt and Pepper, to taste

Blend together and store in fridge for 2 weeks

*Pour over top your salad, and enjoy!

Foodstirs

Another company I am loving:

F O O D S T I R S

Foodstirs sent me some of their products to try, a little bit ago. I was intrigued with their company and wanted to know more. They aren't expecting me to do a post about them at all, but we whipped up their treats a few days ago, had some fun with the frosting, and I loved everything I tasted. That's why I'm sharing them with you!

This company is doing some cool things. Their mottos is to bake life sweet. They want you to be able to enjoy their treats without feeling so much of the "guilt." All of their treats are organic, non-GMO with SIX OR LESS real ingredients, free of artificial preservatives, dyes or flavors. I mean, awesome, right!? I'm always a little bit curious as to how these types of treats are going to taste, but I can honesty give them two thumbs up. So delicious, easy to put together, and fun to have for Valentines Day coming up.

^how fun is that packaging!?

I was able to try the Organic Frosted Sweet Tooth Heart Bundle (and it came with a heart cookie cutter... way cute idea for a Valentines gift!) and the Organic Chocolate Lovers Brownie Mix. I loved both, but the sugar cookies were my favorite. Seriously so delicious and fun to decorate.

Foodstirs offers 3, 6, or 12-month subscriptions to their baking kits. So for subscribers, they'll deliver a brand new surprise kit filled with organic mixes and ingredients + decorative supplies to go along with the holidays, etc. right to your doorstep. Super cute idea! I also love any company that helps to give back to the community, as you know. Each month, Foodstirs donates time and resources to a charitable organization in the community. 

Fun to try some new products from a company who is doing some great things. Check them out!

Happiness Hacks to Beat the Winter Blues

January can be a harder month for me.

In Utah and living in the valley, you get stuck in the inversion (yuck), and getting those blue-sky, sunny days is a rarity. I decided this year to beat the winter blues and create my own sunshine. As I focused on doing one happiness hack a day, I realized how much sunshine I could find, among the gloom. If you weren't able to follow along in January, start today and give these a try for this upcoming month. It will make a difference in your life, I can guarantee it.

1. Clean out a drawer or closet and donate anything excess.

2. Buy happy flowers from Trader Joes and watch them open on your kitchen table.

(This idea came from someone who messaged me about their happiness hack. They shared, "My secret is grabbing daffodils from Trader Joes and watching them open on my kitchen table. It reminds me to be open and watching for the sweet feeling of warmth and sunshine amidst the dreary days of January." How sweet is that. I immediately added it to my list.)

3. Smile and make eye contact with everyone you come across while you're out and about.

4. Visit someone who needs a visit, or call someone who needs a call.

5. Move on Monday! Whatever it is, get in 30 minutes of exercise.

6. Get outside to enjoy the sunshine. Find the mountains.

7. Eat 2.5-3 cups of veggies. A healthy body = a healthy mind.

8. Pamper yourself: Give yourself a spa night at home... face mask, bubble bath, yummy candle, paint nails, and of course a yummy snack. 

9. Express your love to someone outwardly: dip kiss in the kitchen, leave a love note under their pillow, be creative!!

10. Say three positive things about yourself in the mirror as you're getting ready for bed.

11. Get 7-9 hours of sleep and set an alarm not only to wake up, but to remind you to go to bed. It works!!

12. Wake up and DECIDE you're going to have the happiest day. See how that decision affects your next ~15 hours. We decide.

13. Make your bed first thing in the morning.

14. Spend at least 10 minutes reading a book you love. Consciously put away your phone and cozy up with a book.

15. Think of someone who has impacted your life in a positive way, whether from the past or more recent, and write them a handwritten letter to stick in the mail or deliver to their doorstep.. this could be a teacher, a coach, a neighbor, a friend, a coworker... My person was my fourth grade teacher, Mrs. Allard. It had been almost 20 years, but I tracked her down so I could deliver the note personally to her. It made my entire week.

16. Invite some friends over for dinner.

17. Set your table fancy for dinner tonight.

18. Turn off all notifications on your phone for social media. Less updates, less distraction.

19. Wake up 30 minutes earlier. That is YOUR time, so do with it what you want... use it for exercise, reading, studying, stretching, meditation ...

20. Turn on your favorite music and pick ONE room to clean that needs some help. Your car can count as a room. ;)

21. LAUGH. Make sure you laugh today. 

xo

Here are my final words to wrap up January and welcome February with open arms:

I suggest we "...stop seeking out the storms and enjoy more fully the sunlight. I'm suggesting that we accentuate the positive. I'm asking that we look a little deeper for the good, that we still our voices of insult and sarcasm, that we more generously compliment virtue and effort." -Gordon B. Hinckley

BE HAPPY TODAY.

And have a wonderful month of February. 

Silver Fern

I have so much to say about this company and this topic, so I'm going to jump right in. 

Let’s start here. In your gut, you have 100 trillion bacteria that line your intestinal tract. Although you can have bad bacteria in there, you have a whole lot of good bacteria as well. The good bacteria aggressively protects your body from the bad, and we need more of it!! The more good bacteria we have, the better off we’ll be!

So how do we get more good bacteria?

We get more of the “good guys” through a number of ways. Some of these ways include cutting out sugar and processed foods, eating more plant and dietary fiber (the good stuff), limiting antibiotics and antacids, finding ways to lower our stress levels, getting consistent sleep of 7-9 hours a night, and taking a probiotic, to name a few.

What is a probiotic and why do I take one every day?

Probiotics are also the “good guys”: the good live bacteria and yeasts that help you and your digestive system. They help to keep your gut (and other things!) healthy.

I have become more and more interested in gut health, because I’m realizing most diseases we acquire start right there. Around 80% of our immune system is linked to the gut. I’ve also been astonished at how many people I’ve talked to lately, deal with gut issues. As a nurse, every week I work with kids who are experiencing chronic gut diseases and having to deal with the symptoms and side effects that come with that. Many of these gut issues, including gluten intolerance, can be healed and alleviated by managing what we put into our bodies and resetting our gut environment.

Changing your gut bacteria and taking a probiotic, will not only help to reprogram your metabolism, but it will help you to lose weight faster, reduce your sugar cravings, keep your brain healthy and happy, reduce the bad gut bacteria, keep you away from disease, and turn you into a fat-burning machine.

Also, did you realize the connection our brains have to our gut? It’s incredible. Depression, anxiety, ADHD, addition… all of these things can be helped tremendously by having a healthy gut. Scientists have discovered there is a direct pathway from the gut to the brain, known as the gut-brain axis. This pathway gives gut bacteria power to communicate directly with your brain. The more good bacteria we have in there, the less sugary cravings we’ll get, and the better our brains will function.

Fiber, along with a probiotic, is also essential to this plan because it acts as a prebiotic. In short, a prebiotic is fiber that nourishes the good bacteria already in the large intestine. While probiotics give us more of the good bacteria for our gut, prebiotics help nourish what’s already there. Those two together have a powerful force for good! This combination also creates something called short chain fatty acids (SCFAs). SCFAs are what drive the metabolism change in our bodies and help us burn more fat.

Why I choose Silver Fern:

If you're looking to use a probiotic supplement, this is one I'd recommend. Let me tell you why I choose Silver Fern.

There are many probiotics on the market, and going to look for the right one can be overwhelming. The sad truth is, many of the probiotics you find on the shelves at the store don’t work. Only certain strains have been clinically proven to survive the stomach acids and make it all the way to the large intestine where they can colonize (because that’s where we want them to go!). You want to be looking for the Bacillius strains, or strains that will make it all the way to where you need them. The strains with the most powerful benefits include Bacillus Subtilis, Bacillus coagulans, and Bacillus clausii. Silver Fern’s pass this survivability test.

Not only is Silver Fern’s probiotic survivability verified, but it has 8 billion CFU (an adequate, quality daily consumption), it’s DNA verified (which means they’ve listed exactly what you’re taking on the bottle- without this, you have no idea what could be in there), and pharmaceutical grade... all things you want to look for in a good probiotic.

How to benefit most from taking a probiotic:

Silver Fern has their “Elevated 7-Step Plan” that really guides you through this process, but I’ll make it simple: If you are going to take a probiotic and want to reap the benefits, this is what I’d recommend:

1.     Set achievable goals when it comes to diet. I’d have to agree with this short saying … “Eat food. Not too much. Mostly plants.” –Michael Pollan. Keep eating your whole, real foods, and set realistic expectations for yourself. Reduce your added sugar and refined carbs (white breads, pasta, etc.)…Eating too much sugar and not enough fiber will only encourage bad bacteria to grow and this road leadings to obesity and other health problems. As we know, bad bacteria thrives on sugar and cutting down on these foods will help!

2.     Eat more fiber. Once you’ve begun to take a probiotic, as you also increase your fiber intake, you start to reprogram your metabolism for lasting weight loss. The minimum daily requirement of fiber for men is 30 grams and 25 grams for women. Foods that have a lot of fiber include:  raspberries, bananas, mangos, pears, apples, bran muffins/bran flakes, black beans, almonds, peanuts, peas, broccoli, artichokes, corn, or Silver Fern’s Plant-Based Protein Formula / Wai Probiotic Drink Mixes.

3.     Eliminate artificial sweeteners: things like Sucralose (Splenda), Aspartame, Saccharin (Sweet ‘N Low), Neotame, etc. They also encourage growth of bad bacteria and other studies have shown these sweeteners can actually make you MORE hungry! Stay away from them.

4.     Drink water! Try to aim for 100 oz. of water a day, but start with half your body weight, in ounces of water, and go from there.

Silver Fern claims that after 4 weeks of following their Elevated plan, and taking their probiotics, your cravings for sweets and treats will be reduced. They say after just 9 weeks, your metabolism will start to improve drastically. That’s pretty amazing!

If there’s one thing I’ve learned, it’s to protect your gut!! It’s going to be your best defense, and Silver Fern has things right.

Some of their other products if you’re interested:

Wai drink mixes: These are my other favorite product from Silver Fern, next to the probiotic. I don’t mind the taste one bit- in fact, I like it! My husband and my daughter love it too! A great way to get some prebiotics and probiotics in for you and your kids.

Baking mixes: low in sugar and refined carbs and high in fiber and protein. Also, gluten free!

Whey Protein Powder: (I love their chocolate whey protein powder and use it in my chocolate PB almond protein balls (which I'll post soon). Give it a try!